
Artisan bread Recipe has a reputation for being difficult — something that requires years of practice, specialized equipment, or a professional kitchen. The reality is more accessible than that. The two recipes in this guide produce genuinely excellent results with ingredients you likely already have and equipment that fits in most home kitchens.
The first is a classic French-style loaf with a crackling crust and open crumb — two loaves from one batch. The second is a no-knead Dutch oven loaf that delivers a bakery-quality crust with almost no active work. Both use active dry yeast and standard all-purpose flour.
What Makes Bread ‘Artisan’?
Artisan bread differs from commercial sandwich bread primarily in technique and ingredients:
- Simple ingredients: Flour, water, salt, yeast — no preservatives, no dough conditioners, no shelf-extending additives
- Longer fermentation: Slower rises (often 12 to 24 hours for no-knead methods) develop complex flavor
- High heat baking: Artisan loaves are typically baked at 425–500°F for a hard, crackling crust
- Steam in early baking: Steam in the first phase of baking keeps the crust extensible so the loaf can expand fully before setting
- Hand-shaped: The irregular, rustic form of artisan bread is shaped by hand, not a tin
The good news: all of these elements are achievable at home without professional equipment.
Equipment You Need
| Equipment | Required? | Notes |
| Large mixing bowl | Yes | Any large bowl |
| Dutch oven or cast iron pot with lid | For Recipe 2 | 5–7 quart; Le Creuset, Lodge, or similar |
| Baking sheet | For Recipe 1 | Standard rimmed baking sheet |
| Parchment paper | Recommended | Prevents sticking; required for Dutch oven method |
| Bench scraper or dough scraper | Helpful | For shaping; a spatula works |
| Kitchen scale | Helpful | Weight measurements are more accurate than volume |
| Instant-read thermometer | Optional | Fully baked bread registers 200–210°F internally |
| Oven thermometer | Recommended | Most home ovens run 25°F off — calibrate before baking |
Artisan Bread Recipe 1: Classic French-Style Loaves
This recipe produces two long, French-style loaves with a golden crust and light interior — great for sandwiches, dipping in olive oil, or serving alongside pasta. Active time is about 20 minutes; total time including rises is 3 to 4 hours.
Ingredients (Makes 2 Loaves)
- 3¼ teaspoons (1½ packages) active dry yeast
- 1 tablespoon sugar
- 1 tablespoon kosher salt
- 2 cups warm water (110–115°F — warm to the touch but not hot)
- 5 to 6 cups unbleached all-purpose white flour, plus more for dusting
- 1 egg white (for brushing)
- Cornmeal (for dusting the baking pan)
Instructions
- Proof the yeast: Combine the sugar, yeast, and warm water in a large bowl. Stir briefly and let sit for 5 to 10 minutes until the mixture is foamy. If it does not foam, the yeast is inactive — start again with fresh yeast.
- Add flour: Add the salt, then add flour 2 cups at a time, mixing after each addition. When the dough becomes too stiff to stir, turn it out onto a lightly floured surface.
- Knead: Knead vigorously for 8 to 10 minutes until the dough is smooth, elastic, and springs back when poked. It should no longer stick to your hands. Add flour sparingly if it remains sticky — too much flour makes a dense loaf.
- First rise: Lightly butter the bowl, place the dough back in, and cover with a damp kitchen towel or plastic wrap. Place in a draft-free spot (inside a turned-off oven works well). Let rise until doubled in bulk — approximately 1.5 to 2 hours.
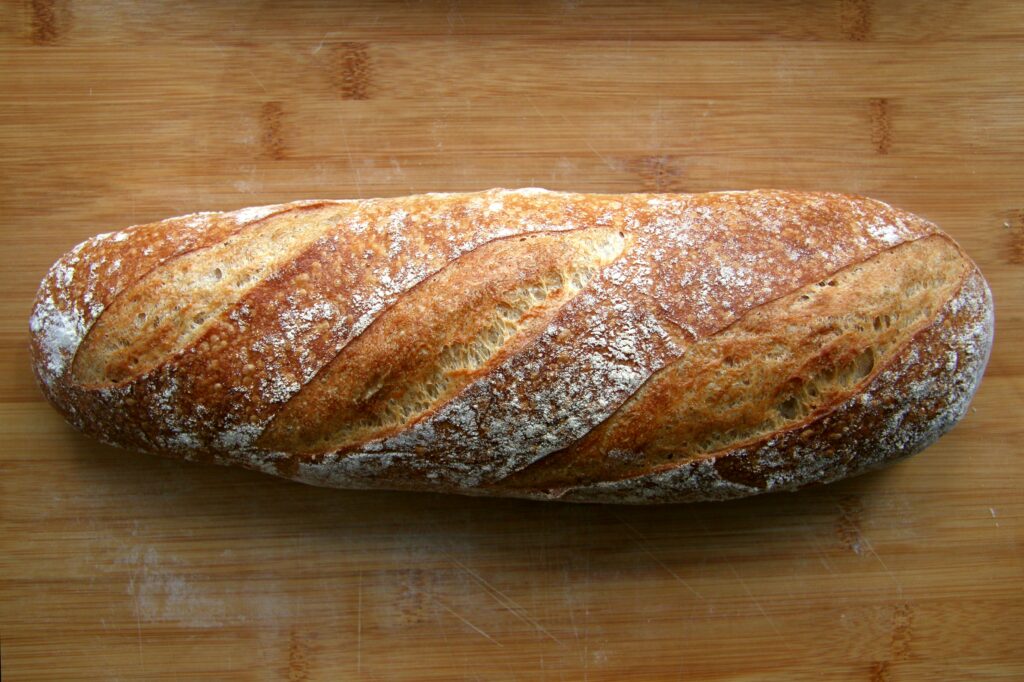
- Shape: Punch down the dough and divide in half. Shape each half into a long loaf — roll and stretch the dough gently into a baguette shape roughly the length of your baking pan. Place on a cornmeal-dusted baking sheet.
- Score and egg wash: Using a sharp knife or bread lame, slash several diagonal cuts across the top of each loaf (about ½ inch deep). This allows the bread to expand properly during baking. Brush with egg white.
- Create steam: Place an empty baking pan on the bottom rack of your oven. When you add the loaves, pour 1 cup of hot water into the empty pan — the steam is what creates the crispy crust.
- Bake: Start the loaves in a cold oven set to 375–400°F (do not preheat). Bake for 30 to 40 minutes until the crust is deep golden brown. Tap the bottom of a loaf — it should sound hollow when fully baked.
- Cool: Let the loaves cool on a wire rack for at least 20 minutes before slicing. Cutting too early compresses the interior and releases steam that would otherwise finish the crumb.
Serving Suggestions
- Sliced with salted honey butter while still warm
- Used as sandwich bread — the loaves are the ideal size for individual sandwiches
- Alongside pasta or soup — the crust holds up well to dipping
Artisan Bread Recipe 2: No-Knead Dutch Oven Loaf
This is the most forgiving artisan bread recipe you can make. The dough requires no kneading and almost no active work — you mix it, wait, and bake it in a covered Dutch oven that creates the steam environment automatically. The result is a round loaf with a crackling, bakery-quality crust and an open, chewy crumb.
Active time: 10 minutes. Total time: 4 to 6 hours (or overnight).
Ingredients (Makes 1 Round Loaf)
- 3 cups (360g) unbleached all-purpose flour or bread flour
- ¼ teaspoon active dry yeast
- 1¼ teaspoons kosher salt
- 1½ cups water (125–135°F — hotter than the French loaf recipe)
Optional Add-Ins
- ½ cup pitted olives, roughly chopped — traditional Sicilian addition
- ½ cup whole wheat flour substituted for ½ cup white flour — adds nutty flavor and nutrition
- 1 tablespoon fresh rosemary — aromatic and excellent with olive oil
Instructions
- Mix: Combine flour, yeast, and salt in a large bowl. Pour in the hot water and mix with a wooden spoon until all flour is incorporated and no dry patches remain. The dough will look rough and shaggy — this is correct. Do not over-mix.
- Rest: Cover the bowl tightly with plastic wrap. Leave at room temperature in a draft-free spot for 3 to 6 hours — the dough should roughly double and the surface will show bubbles. Longer resting (up to overnight in the refrigerator) develops even more flavor.
- Shape: Turn the dough out onto a lightly floured surface. Using a bench scraper or floured hands, fold the edges of the dough toward the center, rotating as you go, until you have a rough ball shape. Flip it seam-side down. The dough will be sticky — use flour on your hands but resist adding too much flour to the dough itself.
- Rest again: Place the dough ball on a piece of parchment paper. Let it rest for 30 minutes while your oven preheats.
- Preheat Dutch oven: Place your Dutch oven (with lid) in the oven and preheat to 450°F for at least 30 minutes. The pot must be screaming hot — this is what creates the oven-spring and the crust.
- Bake covered: Carefully lift the dough on its parchment paper and lower it into the hot Dutch oven. Put the lid on. Bake for 30 minutes covered.
- Bake uncovered: Remove the lid and bake for an additional 10 to 20 minutes until the crust is deep golden brown. The internal temperature should reach 200–210°F.
- Cool: Remove from the Dutch oven and cool on a wire rack for at least 30 minutes. The interior continues cooking from residual heat — cutting too early will reveal a gummy center.
Key Techniques and Tips
The Importance of Water Temperature
Yeast is alive and sensitive to temperature. The French-style loaf uses warm water at 110–115°F — hot enough to activate the yeast but not hot enough to kill it. The Dutch oven loaf uses hotter water (125–135°F) because the very small amount of yeast (¼ teaspoon vs 3¼ teaspoons in the French loaf) needs the aggressive initial heat to activate.
- Below 100°F: Yeast will be slow or inactive
- 110–115°F: Ideal for standard yeast recipes
- Above 140°F: Kills the yeast — your bread will not rise
If you do not have an instant-read thermometer, 110–115°F feels like very warm bath water — noticeably warm but comfortable to hold your hand in.
Why the Dutch Oven Method Works
The covered Dutch oven replicates the steam-injected professional bread ovens found in bakeries. When you place the dough in the preheated pot and cover it, the moisture from the dough itself creates steam inside the sealed pot. This steam keeps the crust soft and extensible during the first phase of baking, allowing the loaf to expand fully. When you remove the lid for the second phase, the now-set loaf develops its crackling, brown crust.
This is why the Dutch oven method produces a better crust than a standard baking sheet — no home oven manipulation (pan of water, spraying) replicates the sealed environment as effectively.
Calibrate Your Oven
Most home ovens run 25°F or more off from the displayed temperature. If your bread is consistently over- or under-baking, place a separate oven thermometer inside to check the actual temperature. This single adjustment will improve your baking results more than almost anything else.
Scoring the Dough
Scoring (slashing the top of the loaf before baking) is not decorative — it controls where the loaf expands. Without scoring, the bread will burst unpredictably at its weakest point. Score with a sharp blade at a 30-degree angle, about ½ inch deep. A razor blade or bread lame gives the cleanest cuts; a serrated knife works if it is sharp enough.
Troubleshooting
| Problem | Likely Cause and Solution |
| Dough didn’t rise | Yeast was dead (water too hot, or yeast expired); verify yeast is foamy before adding flour |
| Dense, heavy loaf | Too much flour; under-kneaded; not enough rise time; oven too cool |
| Gummy interior | Under-baked; cut too soon after baking; let cool at least 30 minutes (ideally 1 hour) |
| Crust too pale | Oven temperature too low; bake 5–10 minutes longer; internal temp should be 200–210°F |
| Crust too hard | Over-baked; reduce time slightly; the crust will soften slightly as the loaf cools |
| Bread burst on the side | Not scored; score more deeply and at a lower angle next time |
| Dough too sticky to shape | Wet hands or wet surface; use flour on hands and surface, but don’t add to dough |
Storing Homemade Artisan Bread
- Room temperature: Store cut-side down on a cutting board or in a paper bag — not plastic, which traps moisture and softens the crust. Best within 2 days.
- Freezing: Slice the entire loaf, freeze on a baking sheet, then transfer to a freezer bag. Individual slices can be toasted directly from frozen. Quality up to 3 months.
- Do not refrigerate: Refrigeration causes starch retrogradation — bread goes stale faster in the refrigerator than at room temperature.
Variations to Try
- Rosemary sea salt: Add 1 tablespoon fresh rosemary to either dough; brush with olive oil instead of egg white; sprinkle flaky sea salt before baking
- Whole wheat: Replace up to half the white flour with whole wheat flour for a nuttier, heartier loaf — reduce by a little and expect a slightly denser result
- Olive bread: Add ½ cup pitted, chopped kalamata olives to the Dutch oven dough; particularly good with the Sicilian-style loaf
- Seeded crust: Brush with egg white and press sesame seeds, poppy seeds, or everything bagel seasoning into the surface before baking
Frequently Asked Questions
What is artisan bread?
Artisan bread is bread made by hand using simple ingredients — flour, water, salt, yeast — without preservatives or commercial dough conditioners. It is characterized by a crackling crust, open interior crumb, and complex flavor developed through longer fermentation. The term distinguishes handcrafted bread from mass-produced commercial bread.
What flour is best for artisan bread?
Unbleached all-purpose flour works well for both recipes in this guide. Bread flour (higher protein content, typically 12–14%) produces a slightly chewier, more structured loaf with better oven spring and is an excellent upgrade for the Dutch oven loaf. King Arthur All-Purpose and King Arthur Bread Flour are both reliable choices. Bob’s Red Mill Unbleached All-Purpose is also widely available.
Do you need a Dutch oven for artisan bread?
You need a Dutch oven for Recipe 2 (the no-knead loaf) — the covered pot creates the steam environment that produces the characteristic crust. For Recipe 1 (the French-style loaves), a Dutch oven is not needed; a standard baking sheet with a pan of water for steam works well. A 5 to 7 quart Dutch oven with a lid is the most useful piece of equipment for home bread baking.
How long does artisan bread take to bake?
The baking time for both recipes is 30 to 45 minutes at high heat (375–450°F). The full process including mixing and rising is 3 to 4 hours for the French-style loaves, and 4 to 6 hours for the no-knead Dutch oven loaf. Overnight refrigerator rises are possible for the no-knead method and develop even better flavor.
Why did my artisan bread not rise?
The most common cause is inactive yeast. Verify your yeast is alive by proofing it in warm water (110–115°F) with a pinch of sugar — if it does not foam within 10 minutes, the yeast is dead. Other causes: water too hot (kills yeast), kitchen too cold (slows rise — place dough in a turned-off oven for a warmer environment), or expired yeast.
Final Thoughts
Both recipes in this guide produce bread that is dramatically better than anything from a plastic bag — with a crust that crackles, an interior that tears rather than squishes, and flavor that develops during the rise. The French-style loaves are the more versatile option, giving you two loaves for sandwiches or serving alongside a meal. The no-knead Dutch oven loaf requires barely any active work and consistently produces an impressive round loaf with minimal skill required.
Start with the Dutch oven method if you are new to bread baking — the margin for error is low, the result is reliable, and the technique teaches you what good dough should look and feel like before you move on to more active shaping methods.